Archive for the ‘Java Script’ Category

Tối ưu tốc độ trên website

November 10, 2017

Từ trước đến giờ, khi nghĩ đến việc tối ưu website, mình sẽ nghĩ ngay đến website của hệ thống bán lẻ Thế giới di động: thegioididong.com. Tốc độ tải trang nhanh đến bất ngờ, cứ ngỡ như nó đã được tải sẵn vào trình duyệt và máy tính chỉ tốn thời gian xử lý và hiển thị lên thôi đúng không các bạn 😀

Vậy chúng ta cùng tìm hiểu xem Thế giới di động đã tối ưu frontend (cũng là những thứ mình có thể phân tích được) như thế nào mà đạt được tốc độ khủng như vậy. Những bài viết phân tích này cũng là cách mình note lại cách tối ưu website của các tên tuổi lớn như là một kinh nghiệm để sau này áp dụng cho các dự án của mình.

Nào bắt đầu thôi 😀

Mình có dùng nhiều từ về công nghệ hoặc cách thực hiện mà có thể các bạn thấy lạ. Do là note nên mình sẽ không giải thích chi tiết. Bạn có thể comment bên dưới để mình giải thích rõ hơn hoặc search Google nhé.

Tóm tắt

  • Sử dụng công nghệ mới HTTP/2.
  • Lazyload / Không lazyload mọi thứ khi có thể.
  • Inline tất cả CSS ở header.
  • Gom tất cả Javascript về một file đặt ở footer.
  • Không sử dụng bất kì CSS framework nào, cấu trúc HTML cũng rất gọn khi có rất ít cấp con.

Sử dụng HTTP/2

Thật ra ở tên miền chính thegioididong.com vẫn sử dụng HTTP/1.1 nhưng ở các CDN của website đều đang chạy công nghệ HTTP/2 mới nhất.

Thế giới di động không sử dụng HTTP/2 push để đẩy hình ảnh hoặc javascript sớm hơn. Đơn giản là thegioididong.com không cần javascript cho phần viewport khi người dùng xem trang, điều này có thể dễ hiểu khi bắt đầu nói đến phần Lazyload.

Lazyload bất cứ khi nào có thể

Tất cả những hình ảnh nằm bên dưới viewport (vùng nhìn) đều được lazyload, có nghĩa là chỉ load khi sắp được người dùng cuộn trang và nhìn tới. Kể cả slider đầu trang, những slide từ thứ 2 trở đi đều được lazyload.

Không lazyload bất cứ khi nào có thể

Ơ tại sao vậy? Sao lại ngược lại với bên trên? Như mình nói, chúng ta cảm nhận được ngay rằng website truy cập rất nhanh do thegioididong.com không lazyload hình ảnh đầu tiên của slider đầu trang, không lazyload logo và các icon ở menu chính và gom luôn vào một file hình ảnh duy nhất.

Thật vậy, tất cả các hình ảnh trong vùng nhìn (viewport) của mình đều được load ngay mà không phải chờ đợi gì cả, cộng với dàn máy chủ khủng thì việc hình ảnh hiện ra gần như tức khắc cũng không quá bất ngờ. Riêng 3 hình ảnh Oppo F3, S8 Plus ở cuối ảnh chụp màn hình được lazyload đấy hehe.

Inline tất cả CSS vào header

Tác dụng lớn nhất là trình duyệt sẽ không cần đợi request từ máy chủ trả về dữ liệu rồi mới xử lý mà có thể xử lý ngay lập tức ngay khi trình duyệt vừa đọc tới header. Ngoài ra, thegioididong.com đã pass tiêu chí tránh bị render-blocking với các tập tin CSS, JS mà các website WordPress hay gặp phải.

Đưa tất cả javascript xuống footer

Rất tuyệt vời khi việc đưa JS xuống footer này không ảnh hưởng đến việc lazyload của website. Như mình đã nói, tất cả hình ảnh ở trong vùng nhìn được sẽ tải bằng thẻ <img> bình thường thay vì javascript. Vì vậy người dùng sẽ có ngay một trang web hoàn chỉnh ngay cả khi javascript chưa được load. Cuối cùng, việc đưa javascript xuống footer cũng không ảnh hưởng quá nhiều đến việc hiển thị website.

Ngoài ra, code javascript cũng từng phân trang sẽ được đặt tên khác nhau và chỉ load khi cần, ví dụ ở trang chủ sẽ có home.min.js, ở trang chi tiết sản phẩm sẽ có detail.min.js chẳng hạn 😀

Việc không sử dụng các code tracking của bên thứ ba cũng là một phần giúp tốc độ website ở mức tốt nhất có thể. Tất nhiên Thế giới di động có hệ thống tracking riêng chứ không phải bỏ ngỏ khách hàng nhé 😛

Code rất gọn

Như mình đã nói, việc thegioididong.com không sử dụng bất kì CSS framework nào dành cho việc dựng trang, kể cả CSS reset, đơn giản chỉ là dòng * {margin:0; padding:0} thôi 😀

Việc này thứ nhất làm CSS gọn đi rất nhiều và giúp máy chủ xử lý, minify khi cần thiết nhanh hơn. Ngoài ra, CSS càng ngắn càng tốt. Đối với các theme WordPress nặng như Porto, việc inline hàng MB nội dung CSS vào trình duyệt đã thấy rất mệt, chưa kể Facebook cũng không fetch được dữ liệu website để hiển thị hình đại diện, tiêu đề, thông tin nếu CSS quá dài đâu nhé, kinh nghiệm đau thương của mình đó 😀

HTML cũng vậy, nhờ việc không sử dụng CSS framework nào giúp code gọn đi rất nhiều, chỉ cần truy cập vào 1, 2 cấp node con đã có thể chạm tới phần nội dung được hiển thị rồi 😀

Một số tối ưu khác

Ở trang chi tiết sản phẩm, Thế giới di động đã đặt hàm setTimeout có giá trị 7s kể từ khi người dùng tải trang xong chỉ để hiển thị nút Like và Share của Facebook. Cá nhân mình nghĩ giá trị này hơi cao, nếu có thể thì giảm xuống 4 hoặc 5 giây là hợp lý. Tất nhiên mình nghĩ TGDĐ có lí do khi đặt ra giá trị này.

Thế giới di động cũng tối ưu hình ảnh khá tốt, dàn CDN và máy chủ chắc có lẽ khá khủng cũng là một trong những lí do để website đạt được tốc độ như điện xẹt vậy.

Còn bạn thì sao, bạn thấy Thế giới di động đã làm gì khác để nâng cao tốc độ website của mình, hãy chia sẻ cảm nhận tại đây nhé 😀

Nguồn DAT

How To Host JavaScript Or CSS Files On Google Drive

March 19, 2015

How To Host JavaScript Or CSS Files On Google Drive

Many bloggers use a custom template for their blog and a custom template sometimes requires an external JavaScript file, but sadly we can’t host the JavaScript or CSS file on Blogger because Blogger only allows us to upload images and videos.
Previously, most bloggers would use Google Code (http://code.google.com/hosting) to host these files because Google Code’s project hosting feature is very simple to use and free. But since Google announced that they are deprecating almost all download options for Project hosting on Google Code, we have to switch to Google Drive as recommended by Google itself.

Starting today, existing projects that do not have any downloads and all new projects will not have the ability to create downloads. Existing projects with downloads will see no visible changes until January 14, 2014 and will no longer have the ability to create new downloads starting on January 15, 2014. All existing downloads in these projects will continue to be accessible for the foreseeable future.

If your project is using downloads to host and distribute files and has a need to periodically create new downloads, we recommend you move your downloads to an alternate service like Google Drive before January 15, 2014.Google

Actually it is not so hard to use Google Drive, just create a folder, upload the JavaScript file (or any other file like images, videos, documents including PDFs and Microsoft Office files) and then change the file’s sharing settings from “private” to “public on the web”, or simply change the folder’s sharing settings from “private” to “public on the web” and all files inside that folder will have the same sharing permissions, but the tricky part is getting the proper direct link for the JavaScript or CSS files, so we can use it on the blogger template. Please follow the steps below to host your JavaScript or CSS file using Google Drive:

Method 1

With this method you can get the proper link with the file name:
https://googledrive.com/host/folder-id/filename

Example:
https://googledrive.com/host/0B47Pdqj–olfUENkNGhtX3lSN0U/example.js
https://googledrive.com/host/0B47Pdqj–olfUENkNGhtX3lSN0U/example.css

How to add an external JavaScript to a web page (blogger template)?
<script type=’text/javascript’ src=’https://googledrive.com/host/folder-id/filename.js’></script&gt;

How to add an external CSS to a web page (blogger template)?
<link href=’https://googledrive.com/host/folder-id/filename.css&#8217; rel=’stylesheet’ type=’text/css’>

Step 1:
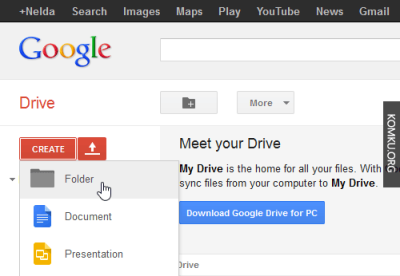
Login to your Google Drive account > Click Create > Select Folder

Create a folder
 Step 2:

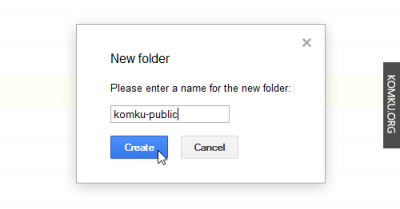
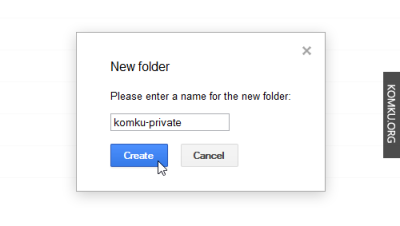
Type a name for the folder and click Create button

folder name google drive

Step 3:
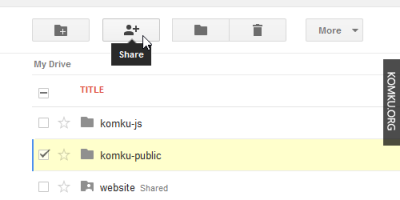
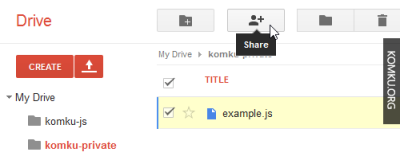
Select the folder and then click the Share button

click share button

Step 4:
Click Change…

click change
 Step 5:

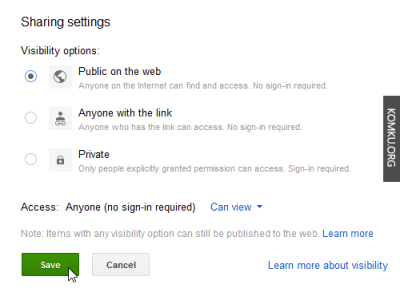
Change the sharing settings from “Private” to “Public on the web” > Click Save > Click Done

change the sharing settings

Step 6:
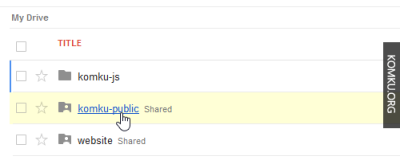
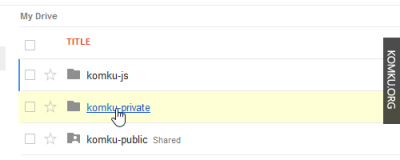
Now click on the folder’s name to go into it

click on the folder name

Step 7:
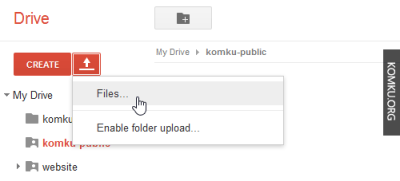
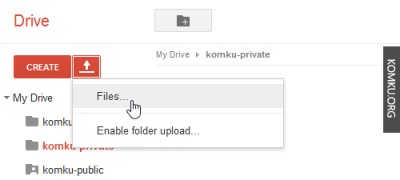
Click the Upload button > Select Files…

upload files

Step 8:
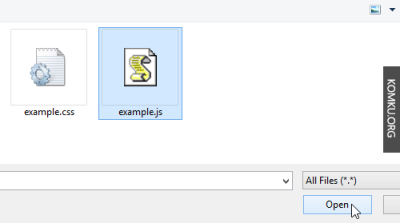
Select file > Click Open

select the files

Step 9:
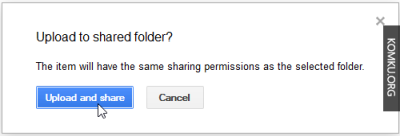
The item will have the same sharing permissions as the selected folder…. Click Upload and share

upload and share

Step 10:
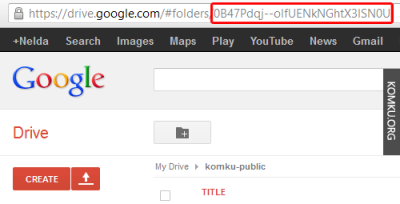
Copy the string characters after #folders/

google drive folder id

Step 11:
Open a new browser tab > paste that string (folder id) into the address bar after
https://googledrive.com/host/
Example: https://googledrive.com/host/0B47Pdqj–olfUENkNGhtX3lSN0U

Step 12:
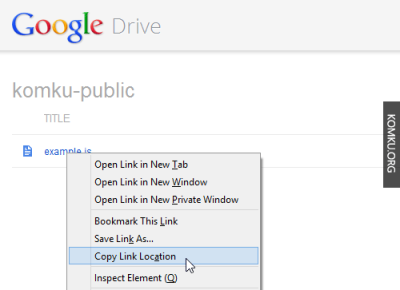
To get the direct link to the file, right click on example.js > Select Copy Link Location (Firefox)

copy link location

Method 2

With this method you can get the proper link without the file name:
https://googledrive.com/host/file-id

Example: 
https://googledrive.com/host/0B47Pdqj–olfcUNkV3o3SjdoVGM
https://googledrive.com/host/0B47Pdqj–olfVVg3MFgxVlpqd0k

How to add an external JavaScript to a web page (blogger template)?
<script type=’text/javascript’ src=’https://googledrive.com/host/file-id’></script&gt;

How to add an external CSS to a web page (blogger template)?
<link href=’https://googledrive.com/host/file-id&#8217; rel=’stylesheet’ type=’text/css’>

Step 1:
Login to your Google Drive account > Click Create > Select Folder

create a folder - google drive

Step 2:
Type a name for the folder and click the Create button

private folder name

Step 3:
Click on the folder’s name to go into it

go to the folder

Step 4:
Click the Upload button > Select Files…

click upload button

Step 5:
Select file > Click Open

select the files

Step 6:
Select the checkbox to select the file > Click the Share button

click share button

Step 7:
Click Change…

click change

Step 8:
Change the sharing settings from “Private” to “Public on the web” > Click Save

change the sharing settings

Step 9:
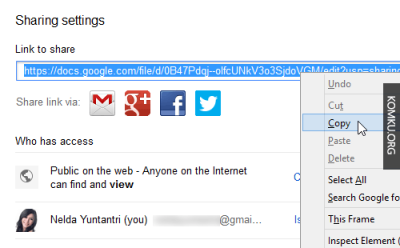
Copy the link > paste in Notepad

Example:  
https://docs.google.com/file/d/0B47Pdqj–olfVVg3MFgxVlpqd0k/edit?usp=sharing
File ID: 0B47Pdqj–olfVVg3MFgxVlpqd0k

Paste the file id after: https://googledrive.com/host/

Direct link to the file:
https://googledrive.com/host/0B47Pdqj–olfcUNkV3o3SjdoVGM

copy the file id - google drive

SOURCE: http://www.komku.org/2013/08/how-to-host-javascript-or-css-files-on-google-drive.html

Visible or hidden div by javascript

July 30, 2010

document.getElementById(‘divStart’).style.display = ‘none’;
document.getElementById(‘divStart’).style.visibility = ‘hidden’;

document.getElementById(‘divStop’).style.visibility = ‘visible’;
document.getElementById(‘divStop’).style.display = ‘block’;

—————-

Delete border of text box: <input type=”text” name=”timeTxt” id=”timeTxt” value=”00:00:00″ style=”border:none;background-color: ##ffffff;border: ##fffff 1px solid;”></input>

Set text for Div in IE & Firefox

July 29, 2010
function placeText(myDiv){
  if (top) {
    var messageField = top.document.getElementById('message')
    if (messageField) {
       var message = document.getElementById(myDiv).innerText || document.getElementById(myDiv).textContent;
       messageField.value += message;
    }
  }
  return false
}

Some common java script functions

September 7, 2009

The eval() function evaluates a string and executes it as if it was script code.

<script type=”text/javascript”>

eval(“x=10;y=20;document.write(x*y)”);
document.write(“<br />”);

document.write(eval(“2+2”));
document.write(“<br />”);

var x=10;
document.write(eval(x+17));
document.write(“<br />”);

</script>

Output:

200

4

27

Using html control

document.getElementById(‘controlId’).value

URL-Encoding

escape(“It’s me!”) // result: It%27s%20me%21

Using Multiple JavaScript Onload Functions

September 3, 2009

 Sometimes, many functions are called after pageload (html page). It is not good if we write code directly in html, not in function, exspecially when we use back button  in IE browser.

<body>

….

<script> callSomeThingDirectly(); </script>

….

</body>

The callSomeThingDirectly() function runs before page onload, so it gets old value of the browser.

It’s better and works well if we call the functions in pageload, like this:

function func1() {
  alert(“This is the first.”);
}
function func2() {
  alert(“This is the second.”);
}

function addLoadEvent(func) {
  var oldonload = window.onload;
  if (typeof window.onload != ‘function’) {
    window.onload = func;
  } else {
    window.onload = function() {
      if (oldonload) {
        oldonload();
      }
      func();
    }
  }
}
addLoadEvent(func1);
addLoadEvent(func2);
addLoadEvent(function() {
    document.body.style.backgroundColor = ‘#EFDF95’;
})

Source:  http://www.htmlgoodies.com/beyond/javascript/article.php/3724571